
2020-09-27

2020-08-24
BIOS和EC
硬件平台
BIOS介紹
功能
類型,種類
內部模塊(AWARD為例)
EC介紹
功能(IT8511E LPC EC為例)
EC與BIOS關係
硬件平台
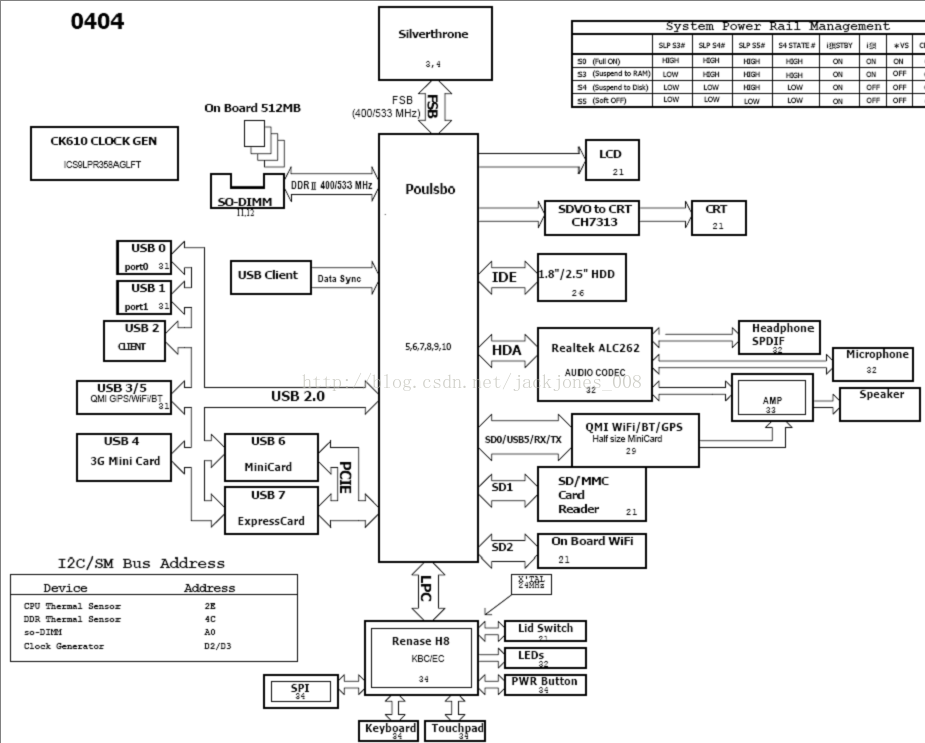
BIOS介紹
BIOS (Basic Input Output System)即基本輸入/輸出系統。
存放在一個不需要電源的記憶體(芯片)中,這就是平時所說的BIOS。
它為計算機提供最低級的、最直接的硬件控制。
BIOS的功能:
1.自檢及初始化
2.程序服務
3.設定中斷
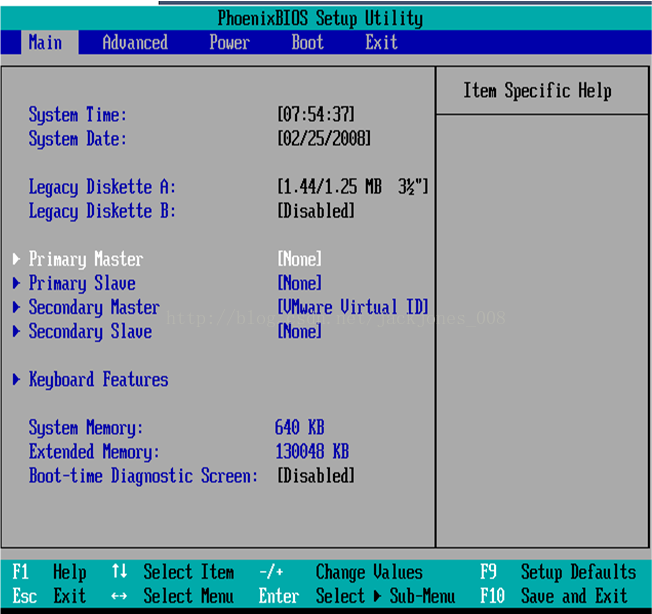
BIOS的類型
AMI, Award, Phoenix
BIOS芯片的種類
FLASH ROM
EPROM
PROM
MARK PROM
BIOS和CMOS
BIOS是一組設置硬件的電腦程序,而CMOS是電腦主板上的一塊可讀寫的RAM芯片。
CMOS芯片由主板上的充電電池供電,即使系統斷電,參數也不會丟失。
內部模塊(Award BIOS)
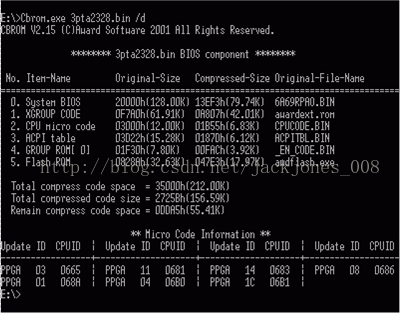
注:以上模塊的序號及文件名稱,在不同的BIOS中並不相同,某些模塊,在某些BIOS中並不存在。
EC介紹
EC(Embed Controller,嵌入式控制器)是一個16位單片機,它內部本身也有一定容量的Flash來存儲EC的代碼。
在關機狀態下,EC一直保持運行,並在等待用戶的開機信息。
而在開機後,EC更作為鍵盤控制器,鼠標,觸摸板,充電指示燈以及風扇等設備的控制,它甚至控制著系統的待機、休眠等狀態。
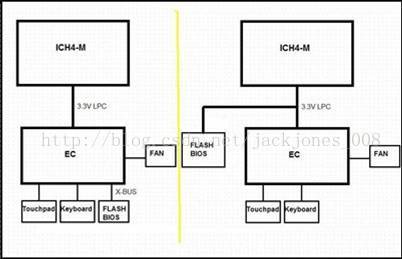
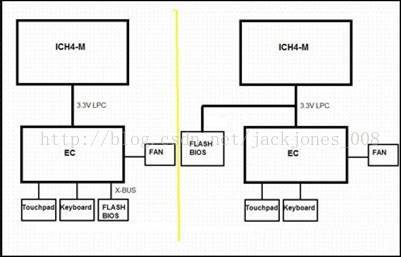
主流筆記本系統中,EC在系統架構中的地位如下圖:
現在的EC有兩種架構,上圖左邊是比較傳統的,一般這種情況下EC的代碼也是放在FLASH中的,也就是和BIOS共用一個FLASH。
右邊的則是比較新的架構,一般它只使用EC內部的ROM。
EC上一般都含有鍵盤控制器,所以也稱KBC(Keyboard Controller)。
功能(IT8511E LPC EC)
LPC Bus I/F
8032TT (Twin turbo version)
3 SM Bus (spec. 2.0) channels
32 interrupt events to EC
Timer/Watch Dog Timer
2 Power Management Channel
Total Support 73-port GPIO’s
8042 style KBC interface
12 channels ADC
6 channels 8-bit DAC
8 PWM
Support 3 PS2 ports
18x8 Keyboard matrix scan
Customer Remote Controller IR
EC BIOS關係
在系統關機的時候,只有RTC部分和EC部分在運行。
在檢測到用戶按開機鍵後,EC會通知整個系統把電源打開。CPU被RESET後,會去讀BIOS內一個特定地址內的指令。
對於上圖左邊的結構:在這個系統中,EC起到了橋接BIOS和南橋(或者說整個系統)的作用。
對於上圖右邊的結構:在這地址南橋後,會直接通過LPC到BIOS,不需要EC的橋接。
這裡需要說明的是,對於台式機而言,一般是不需要EC的。這裡原因有很多:
台式機本身的ATX電源就具有一定的智能功能,已經能受操作系統控制來實現待機、休眠的狀態
由於筆記本的鍵盤不能直接接到PS/2接口,而必須接到EC之上;
筆記本有更多的小功能,比如充電指示燈、WIFI指示燈、Fn等很多特殊的功能,而且筆記本必須支持電池的充放電等功能,而智能充放電則需要EC的支持。
筆記本TFT屏幕的開關時序也必須由EC控制。這些原因導致了筆記本使用EC來做內部管理的必要性。
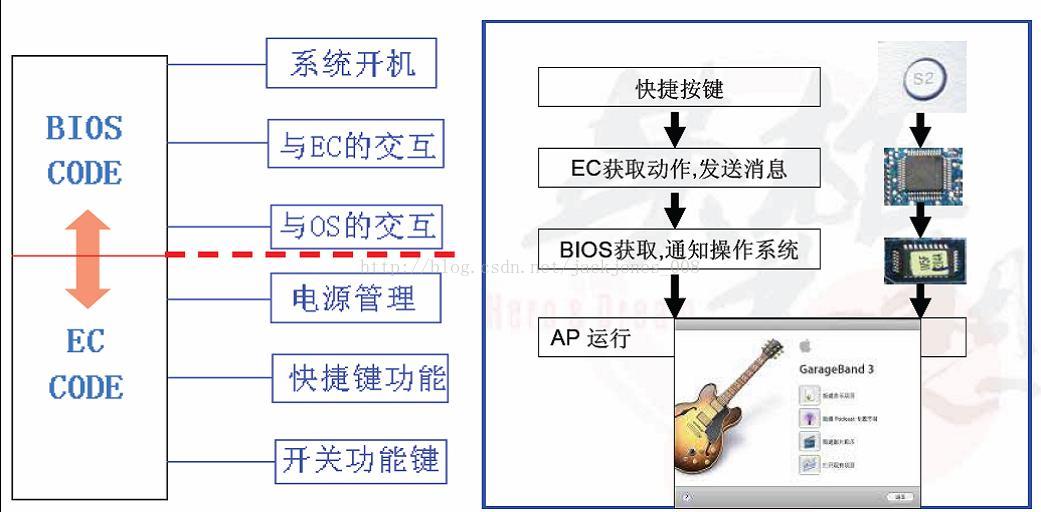
總體來說,EC和BIOS都處於機器的最底層。EC是一個單獨的處理器,在開機前和開機過程中對整個系統起著全局的管理。
而BIOS是在等EC起來後才開始運行的。如果說BIOS是底層系統的話,那EC似乎更加底層。
2020-08-02
Upgrade buffalo WZR-HP-G450H from Original to DD-WRT/OPENWRT
DD-WRT 直接在 UI 即可升級
OPENWRT - 奮鬥一天無果, 後來參照此文才成功
唯一的困擾是無法直接升上 v19.07.3, 必須完全照本文, 先升級到 v18.06.1, 再利用 LuCI 升到 v19.07.3
將 M:\Hardware_Aux\Buffalo_WZR-HP-G450H 目錄下之所有文件先看一遍
2020-01-21
使用 BlueScreenView 分析找出導致 BSoD 的相關軟件或 driver
下載 Nirsoft BlueScreenView (portable)
If your system doesn't create MiniDump files on a blue screen crash, try to configure it according to the following article: How to configure Windows to create MiniDump files on BSOD or Is Your Computer Crashing? Find Out Why in 5 min.
BlueScreenView is a small and portable tool developed by NirSoft that is capable of quickly showing you which file caused the blue screen. All you need to do is download the program, run it and it will automatically analyze the minidump files that are created during the blue screen. The top pane shows the dump files while the lower pane shows the offending files that caused the crash. If the blue screen is caused by a third party program, the driver file should be listed in the lower pane.

The drivers that are found in crash stack will be highlighted and those are the files that you should pay attention to. Double clicking on the driver file listed at the lower pane will show every detail about the file such as the stack addresses, size, time stamp and etc. We can see that it was a system file driver belonged to “Resplendence WhoCrashed Crash Dump Test” that caused the blue screen.

設定 minidump 目錄時, 可能會出現以下畫面:

此時必須將 "虛擬記憶體" 交由系統 "自動管理所有磁碟分頁檔大小" 才行.
If your system doesn't create MiniDump files on a blue screen crash, try to configure it according to the following article: How to configure Windows to create MiniDump files on BSOD or Is Your Computer Crashing? Find Out Why in 5 min.
BlueScreenView is a small and portable tool developed by NirSoft that is capable of quickly showing you which file caused the blue screen. All you need to do is download the program, run it and it will automatically analyze the minidump files that are created during the blue screen. The top pane shows the dump files while the lower pane shows the offending files that caused the crash. If the blue screen is caused by a third party program, the driver file should be listed in the lower pane.

The drivers that are found in crash stack will be highlighted and those are the files that you should pay attention to. Double clicking on the driver file listed at the lower pane will show every detail about the file such as the stack addresses, size, time stamp and etc. We can see that it was a system file driver belonged to “Resplendence WhoCrashed Crash Dump Test” that caused the blue screen.


此時必須將 "虛擬記憶體" 交由系統 "自動管理所有磁碟分頁檔大小" 才行.
Windows 10 電腦每晚自動從睡眠中喚醒
I put my computer to sleep before going to bed, but the signon screen is brightly lit every morning. Furthermore, when I launch Windows Update, it never seems to finish searching for new updates. In searching for a cause of the waking, I have come across the following potentially useful information. Any assistance will be greatly appreciated.
>powercfg -lastwake
Wake History Count - 1
Wake History [0]
Wake Source Count - 1
Wake Source [0]
Type: Wake Timer
Owner: [SERVICE] \Device\HarddiskVolume3\Windows\System32\svchost.exe (SystemEventsBroker)
Owner Supplied Reason: Windows will execute 'NT TASK\Microsoft\Windows\UpdateOrchestrator\Universal Orchestrator Start' scheduled task that requested waking the computer.
Best Answer by BrianMinjaeKim :
I think i found a fix that doesn't require downloading anything or complicated steps.
It's worked for me so far.
1. Go to: Control Panel\Hardware and Sound\Power Options\Edit Plan Settings (it may also be called Change plan settings)
(you can alternatively just search for "Edit power plan" in the windows search bar)
2. Click "change advanced power settings"
3. Go to "Sleep->Allow wake timers" and change the setting to Disable.

If this doesn't work, then using psexec like RichStevens2 suggested might be the way to go.
The directions i found on another forum was helpful:
"1. First go here to download PsTools. Extract it to a folder on your desktop.
2. Open Start and type cmd. Right-click the program and choose to run as administrator.
3. Navigate to the folder where you extracted the tools by typing "cd C:\Users\Username\Desktop\Pstools", replace Username with your username and Pstools with the folder where you extracted the tools.
4. When you have navigated to the correct folder, copy the following command without the quotes: "psexec.exe -i -s %windir%\system32\mmc.exe /s taskschd.msc".
5. Open the command window and right click, choose paste. Press enter.
6. Navigate to Task Scheduler Library -> Microsoft -> Windows -> UpdateOrchestrator.
7. Right click the task called Reboot and click on Disable.
8. The task should now be disabled"
Hopefully one of these two options works for ya'll
>powercfg -lastwake
Wake History Count - 1
Wake History [0]
Wake Source Count - 1
Wake Source [0]
Type: Wake Timer
Owner: [SERVICE] \Device\HarddiskVolume3\Windows\System32\svchost.exe (SystemEventsBroker)
Owner Supplied Reason: Windows will execute 'NT TASK\Microsoft\Windows\UpdateOrchestrator\Universal Orchestrator Start' scheduled task that requested waking the computer.
Best Answer by BrianMinjaeKim :
I think i found a fix that doesn't require downloading anything or complicated steps.
It's worked for me so far.
1. Go to: Control Panel\Hardware and Sound\Power Options\Edit Plan Settings (it may also be called Change plan settings)
(you can alternatively just search for "Edit power plan" in the windows search bar)
2. Click "change advanced power settings"
3. Go to "Sleep->Allow wake timers" and change the setting to Disable.

If this doesn't work, then using psexec like RichStevens2 suggested might be the way to go.
The directions i found on another forum was helpful:
"1. First go here to download PsTools. Extract it to a folder on your desktop.
2. Open Start and type cmd. Right-click the program and choose to run as administrator.
3. Navigate to the folder where you extracted the tools by typing "cd C:\Users\Username\Desktop\Pstools", replace Username with your username and Pstools with the folder where you extracted the tools.
4. When you have navigated to the correct folder, copy the following command without the quotes: "psexec.exe -i -s %windir%\system32\mmc.exe /s taskschd.msc".
5. Open the command window and right click, choose paste. Press enter.
6. Navigate to Task Scheduler Library -> Microsoft -> Windows -> UpdateOrchestrator.
7. Right click the task called Reboot and click on Disable.
8. The task should now be disabled"
Hopefully one of these two options works for ya'll
2019-11-28
關於export DISPLAY=:0.0
DISPLAY環境變量格式如下host:NumA.NumB,host指Xserver所在的主機主機名或者ip地址,圖形將顯示在這一機器上,可以是啟動了圖形界面的Linux/Unix機器,也可以是安裝了Exceed 、X-Deep/32等Windows平台運行的Xserver的Windows機器。
如果Host為空白,則表示Xserver運行於本機,並且圖形程序(Xclient)使用unix socket方式連接到Xserver,而不是TCP方式。使用unix socket方式連接時則表示連接的unix socket的路徑,如果為0,則表示連接到/tmp/.X11-unix/X0
如果Host非為空白, 使用TCP方式連接時,NumA為連接的端口減去6000的值,如果NumA為0,則表示連接到6000端口;
NumA + 6000 = tcp port #
NumB則幾乎總是0。
---------------------------- 進階 ------------------------------------------------------------------------
如果使用su username或者su - username切換到別的用戶,並且使用命令
export DISPLAY=:0.0
設置DISPLAY環境變量,運行圖形程序(如xclock)時會收到如下錯誤:
Xlib: connection to ":0.0"refused by server
Xlib: No protocol specified
Error: Can't open display: :0.0
這是因為Xserver默認情況下不允許別的用戶的圖形程序的圖形顯示在當前屏幕上.如果需要別的用戶的圖形顯示在當前屏幕上,則應以當前登陸的用戶,也就是切換身份前的用戶執行如下命令
xhost +
這個命令將允許別的用戶啟動的圖形程序將圖形顯示在當前屏幕上.
在2台Linux機器之間,如果設置服務器端配置文件/etc/ssh/sshd_config中包含:
X11Forwarding no
客戶端配置文件/etc/ssh/ssh_config包含:
ForwardX11 yes
則從客戶端ssh到服務器端后會自動設置DISPLAY環境變量,允許在服務器端執行的圖形程序將圖形顯示在客戶端上.在服務器上查看環境變量顯示如下(這個結果不同的時候並不相同)
DISPLAY=localhost:10.0
在客戶機上用netstat -lnp可以看到有程序監聽了6010端口
tcp 0 0 127.0.0.1:6010 0.0.0.0:* LISTEN 4827/1
如果希望允許遠程機器上的圖形程序將圖形顯示在本地機器的Xserver上,除了要設置遠端機器的DISPLAY環境變量以外,還需要設置本地機器的Xserver監聽相應的TCP端口.而現在的Linux系統出於安全的考慮,默認情況下不再監聽TCP端口.可通過修改/etc/X11/xinit/xserverrc文件,將
exec /usr/bin/X11/X -dpi 100 -nolistentcp
修改為
exec /usr/bin/ X11/X -dpi 100
允許在直接使用startx啟動圖形時啟動對TCP端口的監聽.
修改/etc/kde3/kdm/kdmrc,將
ServerArgsLocal=-nolisten tcp
修改為
ServerArgsLocal=
允許kdm作為顯示管理器時,啟動會話時監聽相應的TCP端口.
修改/etc/gdm/gdm.conf,在[Security]一節增加
DisallowTCP=false
或者在登陸窗口選擇"Options" -> "Configure Login Manager..."的Security頁面,取消"DenyTCP connections to Xserver",允許gdm作為顯示管理器時,啟動會話時監聽相應的TCP端口.
--------------------------------------------------------------------------------------------------------
xhost
xhost是用來控制X server訪問權限的。
通常當你從hostA登陸到hostB上運行hostB上的應用程序時,
做為應用程序來說,hostA是client,但是作為圖形來說,
是在hostA上顯示的,需要使用hostA的Xserver,所以hostA是
server.因此在登陸到hostB前,需要在hostA上運行xhost +
來使其它用戶能夠訪問hostA的Xserver.
xhost +是使所有用戶都能訪問Xserver.
xhost + ip使ip上的用戶能夠訪問Xserver.
xhost + nis:user@domain使domain上的nis用戶user能夠訪問
xhost + inet:user@domain使domain上的inet用戶能夠訪
youtube 教學 : Open GUI apps on Windows Subsystem for Linux (and on Raspberry Pi)
如果Host為空白,則表示Xserver運行於本機,並且圖形程序(Xclient)使用unix socket方式連接到Xserver,而不是TCP方式。使用unix socket方式連接時則表示連接的unix socket的路徑,如果為0,則表示連接到/tmp/.X11-unix/X0
如果Host非為空白, 使用TCP方式連接時,NumA為連接的端口減去6000的值,如果NumA為0,則表示連接到6000端口;
NumA + 6000 = tcp port #
NumB則幾乎總是0。
---------------------------- 進階 ------------------------------------------------------------------------
如果使用su username或者su - username切換到別的用戶,並且使用命令
export DISPLAY=:0.0
設置DISPLAY環境變量,運行圖形程序(如xclock)時會收到如下錯誤:
Xlib: connection to ":0.0"refused by server
Xlib: No protocol specified
Error: Can't open display: :0.0
這是因為Xserver默認情況下不允許別的用戶的圖形程序的圖形顯示在當前屏幕上.如果需要別的用戶的圖形顯示在當前屏幕上,則應以當前登陸的用戶,也就是切換身份前的用戶執行如下命令
xhost +
這個命令將允許別的用戶啟動的圖形程序將圖形顯示在當前屏幕上.
在2台Linux機器之間,如果設置服務器端配置文件/etc/ssh/sshd_config中包含:
X11Forwarding no
客戶端配置文件/etc/ssh/ssh_config包含:
ForwardX11 yes
則從客戶端ssh到服務器端后會自動設置DISPLAY環境變量,允許在服務器端執行的圖形程序將圖形顯示在客戶端上.在服務器上查看環境變量顯示如下(這個結果不同的時候並不相同)
DISPLAY=localhost:10.0
在客戶機上用netstat -lnp可以看到有程序監聽了6010端口
tcp 0 0 127.0.0.1:6010 0.0.0.0:* LISTEN 4827/1
如果希望允許遠程機器上的圖形程序將圖形顯示在本地機器的Xserver上,除了要設置遠端機器的DISPLAY環境變量以外,還需要設置本地機器的Xserver監聽相應的TCP端口.而現在的Linux系統出於安全的考慮,默認情況下不再監聽TCP端口.可通過修改/etc/X11/xinit/xserverrc文件,將
exec /usr/bin/X11/X -dpi 100 -nolistentcp
修改為
exec /usr/bin/ X11/X -dpi 100
允許在直接使用startx啟動圖形時啟動對TCP端口的監聽.
修改/etc/kde3/kdm/kdmrc,將
ServerArgsLocal=-nolisten tcp
修改為
ServerArgsLocal=
允許kdm作為顯示管理器時,啟動會話時監聽相應的TCP端口.
修改/etc/gdm/gdm.conf,在[Security]一節增加
DisallowTCP=false
或者在登陸窗口選擇"Options" -> "Configure Login Manager..."的Security頁面,取消"DenyTCP connections to Xserver",允許gdm作為顯示管理器時,啟動會話時監聽相應的TCP端口.
--------------------------------------------------------------------------------------------------------
xhost
xhost是用來控制X server訪問權限的。
通常當你從hostA登陸到hostB上運行hostB上的應用程序時,
做為應用程序來說,hostA是client,但是作為圖形來說,
是在hostA上顯示的,需要使用hostA的Xserver,所以hostA是
server.因此在登陸到hostB前,需要在hostA上運行xhost +
來使其它用戶能夠訪問hostA的Xserver.
xhost +是使所有用戶都能訪問Xserver.
xhost + ip使ip上的用戶能夠訪問Xserver.
xhost + nis:user@domain使domain上的nis用戶user能夠訪問
xhost + inet:user@domain使domain上的inet用戶能夠訪
youtube 教學 : Open GUI apps on Windows Subsystem for Linux (and on Raspberry Pi)
2019-11-27
Debian Buster --- net-tools will be deprecated in favor of iproute2
Here is a summary of the net-tools commands, together with their iproute2 equivalent:
| legacy net-tools commands | iproute2 replacement commands |
|---|---|
| arp | ip n (ip neighbor) |
| ifconfig | ip a (ip addr), ip link, ip -s (ip -stats) |
| iptunnel | ip tunnel |
| nameif | ip link |
| netstat | ss, ip route (for netstat -r), ip -s link (for netstat -i), ip maddr (for netstat -g) |
| route | ip r (ip route) |
from debian stretch (9 release note)
Subscribe to:
Posts (Atom)