DISPLAY環境變量格式如下host:NumA.NumB,host指Xserver所在的主機主機名或者ip地址,圖形將顯示在這一機器上,可以是啟動了圖形界面的Linux/Unix機器,也可以是安裝了Exceed 、X-Deep/32等Windows平台運行的Xserver的Windows機器。
如果Host為空白,則表示Xserver運行於本機,並且圖形程序(Xclient)使用unix socket方式連接到Xserver,而不是TCP方式。使用unix socket方式連接時則表示連接的unix socket的路徑,如果為0,則表示連接到/tmp/.X11-unix/X0
如果Host非為空白, 使用TCP方式連接時,NumA為連接的端口減去6000的值,如果NumA為0,則表示連接到6000端口;
NumA + 6000 = tcp port #
NumB則幾乎總是0。
---------------------------- 進階 ------------------------------------------------------------------------
如果使用su username或者su - username切換到別的用戶,並且使用命令
export DISPLAY=:0.0
設置DISPLAY環境變量,運行圖形程序(如xclock)時會收到如下錯誤:
Xlib: connection to ":0.0"refused by server
Xlib: No protocol specified
Error: Can't open display: :0.0
這是因為Xserver默認情況下不允許別的用戶的圖形程序的圖形顯示在當前屏幕上.如果需要別的用戶的圖形顯示在當前屏幕上,則應以當前登陸的用戶,也就是切換身份前的用戶執行如下命令
xhost +
這個命令將允許別的用戶啟動的圖形程序將圖形顯示在當前屏幕上.
在2台Linux機器之間,如果設置服務器端配置文件/etc/ssh/sshd_config中包含:
X11Forwarding no
客戶端配置文件/etc/ssh/ssh_config包含:
ForwardX11 yes
則從客戶端ssh到服務器端后會自動設置DISPLAY環境變量,允許在服務器端執行的圖形程序將圖形顯示在客戶端上.在服務器上查看環境變量顯示如下(這個結果不同的時候並不相同)
DISPLAY=localhost:10.0
在客戶機上用netstat -lnp可以看到有程序監聽了6010端口
tcp 0 0 127.0.0.1:6010 0.0.0.0:* LISTEN 4827/1
如果希望允許遠程機器上的圖形程序將圖形顯示在本地機器的Xserver上,除了要設置遠端機器的DISPLAY環境變量以外,還需要設置本地機器的Xserver監聽相應的TCP端口.而現在的Linux系統出於安全的考慮,默認情況下不再監聽TCP端口.可通過修改/etc/X11/xinit/xserverrc文件,將
exec /usr/bin/X11/X -dpi 100 -nolistentcp
修改為
exec /usr/bin/ X11/X -dpi 100
允許在直接使用startx啟動圖形時啟動對TCP端口的監聽.
修改/etc/kde3/kdm/kdmrc,將
ServerArgsLocal=-nolisten tcp
修改為
ServerArgsLocal=
允許kdm作為顯示管理器時,啟動會話時監聽相應的TCP端口.
修改/etc/gdm/gdm.conf,在[Security]一節增加
DisallowTCP=false
或者在登陸窗口選擇"Options" -> "Configure Login Manager..."的Security頁面,取消"DenyTCP connections to Xserver",允許gdm作為顯示管理器時,啟動會話時監聽相應的TCP端口.
--------------------------------------------------------------------------------------------------------
xhost
xhost是用來控制X server訪問權限的。
通常當你從hostA登陸到hostB上運行hostB上的應用程序時,
做為應用程序來說,hostA是client,但是作為圖形來說,
是在hostA上顯示的,需要使用hostA的Xserver,所以hostA是
server.因此在登陸到hostB前,需要在hostA上運行xhost +
來使其它用戶能夠訪問hostA的Xserver.
xhost +是使所有用戶都能訪問Xserver.
xhost + ip使ip上的用戶能夠訪問Xserver.
xhost + nis:user@domain使domain上的nis用戶user能夠訪問
xhost + inet:user@domain使domain上的inet用戶能夠訪
youtube 教學 : Open GUI apps on Windows Subsystem for Linux (and on Raspberry Pi)
Showing posts with label Debian. Show all posts
Showing posts with label Debian. Show all posts
2019-11-28
2019-11-27
Debian Buster --- net-tools will be deprecated in favor of iproute2
Here is a summary of the net-tools commands, together with their iproute2 equivalent:
| legacy net-tools commands | iproute2 replacement commands |
|---|---|
| arp | ip n (ip neighbor) |
| ifconfig | ip a (ip addr), ip link, ip -s (ip -stats) |
| iptunnel | ip tunnel |
| nameif | ip link |
| netstat | ss, ip route (for netstat -r), ip -s link (for netstat -i), ip maddr (for netstat -g) |
| route | ip r (ip route) |
from debian stretch (9 release note)
2016-12-23
Debian GNU/Linux 參考卡片
來源 : "今天的 Tetralet 又在唧唧喳喳了", 為求正確, 請儘量以原作者之網站訊息為主.
| 取得說明 | |
| man page 或 man bash | 取得所有命令及許多設定檔的線上說明。 |
| command [--help, -h] | 大多數指令的簡要說明。 |
| /usr/share/doc/[package-name/] | 可在此找到所有文件。或有 README.Debian 檔,內為快速指引。 |
| Web documentation | 包含了參考文件、說明手冊、常見問答、實作指南等等。 位於 http://www.debian.org/doc/ |
| 位於 http://lists.debian.org/ 上的郵件論壇 | 社群永遠在您身旁,請以 users 搜尋。 |
| 位於 http://wiki.debian.org/ 上的 Debian Wiki | 包含了各式各樣的實用資訊。 |
| 安裝 | |
| 安裝程式 | 所有的相關資訊位於 http://www.debian.org/devel/debian-installer/ |
| CD 影像檔 | 可於 http://www.debian.org/distrib/ 下載 |
| boot: expert | 例如:不藉由 DHCP 來設定網路,或用 LILO 來替代 GRUB。 |
| 錯誤 | |
| 位於 http://bugs.debian.org/ 上的錯誤追蹤系統 | 所有現存及已解決的問題的相關資訊。 |
| 特定套件 | 請參閱 http://bugs.debian.org/套件名稱/,使用 wnpp 來請求包裝新套件。 |
| reportbug | 透過電子郵件來回報錯誤。 |
| 回報 | 請參閱 http://www.debian.org/Bugs/Reporting 上的指引 |
| 設定 | |
| /etc/ | 所有的系統設定檔皆位於 /etc/ 目錄裡。 |
| editor files | 預設的文字編輯器。可能是 nano、emacs、vi 或 joe。 |
| 位於 http://hostname:631 上的 CUPS | 透過瀏覽器介面存取印表系統。 |
| dpkg-reconfigure package-name | 重新設定套件,像是 console-common(鍵盤)或是 locales(區域化資訊)。 |
| update-alternatives options | 設定可替代的指令。 |
| update-grub | 在修改了 /boot/grub/menu.lst 之後。 |
| make-kpkg --initrd --revision=2:my.1.0 --rootcmd fakeroot --uc --us kernel_image | 由原始碼編譯 kernel 套件,在真的得使用自訂的 kernel 時。 需要 kernel-package。 |
| m-a a-i module kernel_image | 產生並安裝協力廠商模組 (gspca, ...)。 需要 module-assistant。 |
| 常駐程式和系統 | |
| /etc/init.d/file restart | 重新啟動某個服務或系統常駐程式。 |
| /etc/init.d/file stop | 停止某個服務或系統常駐程式。 |
| /etc/init.d/file start | 啟動某個服務或系統常駐程式。 |
| halt, reboot, poweroff | 停止、重新啟動、將系統關機。 |
| /var/log/ | 所有的日誌檔都位於這個目錄下。 |
| /etc/default/ | 眾多常駐及服務程式的預設值。 |
| 重要的 Shell 指令 | |
| cat files | 將檔案列印到螢幕上。 |
| cd directory | 切換目錄。 |
| cp files dest | 複製檔案及目錄。 |
| echo string | 將字串顯示至螢幕上。 |
| gzip, bzip2 [-d] files | 壓縮/解壓縮檔案。 |
| pager files | 顯示檔案內容。 |
| ls [files] | 顯示檔案列表。 |
| mkdir directory-names | 建立目錄。 |
| mv file1 file2 | 搬移、重新命名檔案。 |
| rm files | 移除檔案。 |
| rmdir dirs | 移除空目錄。 |
| tar [c][x][t][z][j] -f file.tar [files] | 建立(C)、解開(X)、列出(T) 保存檔,z 或 j 分別用於 .gz 或 .bz2。 |
| find directories expressions | 使用像是 -name 名稱 或 -size +1000 等等來尋找檔案。 |
| grep search-string files | 在檔案中尋找 search-string。 |
| kill [-9] number | 傳送訊號給程序。(如:終止它) |
| ln -s file link | 建立一個指向檔案的符號連結。 |
| ps [options] | 顯示當前的程序。 |
| su - [username] | 切換成另一個使用者。例如 root。 |
| sudo command | 讓一般使用者能以 root 來執行某個指令。請參閱 /etc/sudoers |
| command > file | 以指令的輸出結果替代檔案內容。 |
| command >> file | 將指令的輸出結果附加於檔案之後。 |
| cmd1 | cmd2 | 將 cmd1 的輸出結果做為 cmd2 的輸入。 |
| command < file | 將檔案內容作為指令的輸入。 |
| APT (Advanced Packaging Tool)
APT (the Advanced Packaging Tool) is an evolution of the Debian .deb software packaging system. It is a rapid, practical, and efficient way to install packages on your system. Dependencies are managed automatically, configuration files are maintained, and upgrades and downgrades are handled carefully to ensure system stability.
apt-get is the command-line tool for working with APT software packages.
| |
| apt-get update | 更新列於 /etc/apt/sources.list 的套件檔案庫中的套件列表。 用於檔案庫裡的檔案或內容有任何變更時。 |
| apt-cache search search-string | 在套件及其說明文字中搜尋 search-string。 |
| apt-cache policy package-names | 顯示可用套件的版本及優先權。 |
| apt-cache show package-names | 顯示套件的資訊及其說明文字。 |
| apt-cache showpkg package-names | 顯示套件的被相依(相依於它的套件)關係。 |
| apt-get install package-names | 從檔案庫裡安裝套件及其相依套件。 |
| apt-get upgrade | 將所有已安裝套件更新為最新版。 |
| apt-get dist-upgrade | 類似於 apt-get upgrade,但有著更佳的衝突解決機制。 |
| apt-get remove package-names | 移除套件及所有相依於它的套件。 |
| apt-get autoremove | 移除不再和其它套件有相依關係的套件。 |
| apt-cache depends package-names | 列出該套件的所有相依套件。 |
| apt-cache rdepends package-names | 列出相依於該套件的所有套件。 |
| apt-file update | 由套件檔案庫中更新套件列表。請參閱 apt-get update |
| apt-file search file-name | 用檔案來搜尋套件 |
| apt-file list package-name | 列出套件的內容。 |
| auto-apt | 必要時自動安裝套件,可用來取代 apt-file。 需要 auto-apt。 |
| aptitude | APT 的文字介面。 需要 aptitude。 |
| synaptic | APT 的圖形介面。 需要 synaptic。 |
| Dpkg | |
| dpkg -l [names] | 列出套件。 |
| dpkg -I pkg.deb | 顯示套件資訊。 |
| dpkg -c pkg.deb | 列出套件檔的內容。 |
| dpkg -S filename | 顯示某個檔案是屬於哪個套件。 |
| dpkg -i pkg.deb | 安裝套件檔。 |
| debsums | 檢驗已安裝套件的驗証碼。 需要 debsums。 |
| dpkg-divert [options] file | 變更套件裡某個檔案的檔案位置。 |
| dpkg --compare-versions v1 gt v2 | 比較版本號,用 echo $? 來檢視結果。 |
| dpkg-query -W --showformat=format | 查詢已安裝套件,輸出格式為 '${Package} ${Version} ${Installed-Size}\n'。 |
| dpkg --get-selections > file | 將套件狀態寫入檔案。 |
| dpkg --set-selections < file | 利用檔案來設定套件狀態。 |
| 網路 | |
| /etc/network/interfaces | 網路介面的設定檔。 |
| ifup, ifdown [device] | 根據以上的檔案來啟用、關閉網路介面。 |
| /sbin/ip | 顯示及管理網路介面及路由方式。 需要 iproute。 |
| ssh -X user@host | 登入其它的機器。 |
| scp files user@host:path | 將檔案複製到其它機器(或是相反)。 |
| Web 伺服器 (Apache2) | |
| /etc/apache2/ | 設定檔。 |
| /etc/apache2/sites-available/ | 包含了虛擬主機。可用 a2ensite 來啟用某個虛擬主機。 |
| /etc/apache2/mods-available/ | 包含了可用的模組。可用 a2enmod 來啟用某個模組。 |
| 檔案及列印伺服器 (Samba) | |
| /etc/samba/smb.conf | 主要設定檔。 |
| smbclient | 瀏覽 SMB 網路資源,像是下載或上傳檔案。 |
2016-12-16
How do I run update-grub2 from a LiveCD?
Boot with your Live CD (ex. partedmagic...).
Once it boots, open a terminal and mount your Debian partition on /mnt. I'm assuming the Debian partition is /dev/sda5, but you should determine this yourself (fdisk -l). Let me know if you need help to do this:
sudo mount /dev/sda5 /mnt
Then mount a few more directories that are needed:
sudo mount --bind /dev /mnt/dev
sudo mount --bind /sys /mnt/sys
sudo mount --bind /proc /mnt/proc
Also, if you have a separate Debian boot partition (pretty uncommon these days, but it may be the case):
sudo mount /dev/sdaX /mnt/boot
How can you tell if you have a boot partition?
Once you have your Debian partition mounted, open
/mnt/etc/fstab. If you see an entry for /boot, note which device it is pointing to (/dev/sda4 maybe?). This is the one you have to mount.
Once these are mounted, do chroot to start using the mounted directory as the root partition:
sudo chroot /mnt
You'll get a
#/ prompt. First thing to do is confirm that you're using the correct /boot directory. Go to /boot/grub and look at the files there. There should be a bunch of .mod files and a grub.cfg file. If the directory is empty, don't continue, because it means this is NOT your actual boot directory. Look above to see how to determine if you need to mount an additional boot directory.
Once you've confirmed that
/boot/ contains the correct files, meaning that it is the correct location, type:sudo update-grub2
This should rebuild your /boot/grub/grub.cfg file with the menu entries.
Then exit the chroot:
exit
At this point you may want to check that things were correctly updated. For this,
cd /mnt/boot/grub and check that grub's files are there, there should be a bunch of .mod files and grub.cfg, the latter should have entries for your Debian kernels. If you only see grub.cfg and no .mod files, it means that this is NOT the correct boot directory, look above for how to mount a separate boot partition.
Unmount the filesystems:
sudo umount /mnt/dev
sudo umount /mnt/sys
sudo umount /mnt/proc
sudo umount /mnt/boot #Only if you mounted it earlier
sudo umount /mnt/
And then reboot, hopefully your Grub menu will be restored.
讀不到GRUB
開機時,BIOS 有偵測到硬碟,但是 GRUB 無法執行,所以判定是 GRUB 有問題。
解決方法
- 用 Live usb 開機
- Clonezilla UEFI 開機
用 Live Debian 開機,修改GRUB
做好 Live Debian USB 後,先在 BIOS 設定 UEFI 開機,再插入 USB。
進入到 Debian後,開啟 terminal, 查看硬碟的內容,將 /dev/sda2(根目錄分割區) 掛載到 /mnt, 再將 /dev/sda1(EFI 分割區) 掛載到 /mnt/boot/efi。
# fdisk -l   // 看分割區內容
# mount /dev/sda2 /mnt
# for i in /dev /dev/pts /proc /sys /run; do sudo mount -B $i /mnt$i; done
# mount /dev/sda1 /mnt/boot/efi
# chroot /mnt
# grub-install /dev/sda

// 如果遇到 efi variable....
// 退出 chroot
# modprobe efivarfs  // 載入 efi 模組
# for i in /dev /dev/pts /proc /sys /run; do sudo mount -B $i /mnt$i; done
# chroot /mnt
# grub-install /dev/sda
//安裝成功後
# update-grub
# reboot2016-11-10
Dell Inspiron 1501
2018/03/16 : 將 CPU 由 Sempron 3500+ 更換成 AMD Turion 64 X2 TL60 TMDTL60HAX5CT 90nm, socket S1G1 (638). 安裝 Turion CPU後, BIOS PowerNow (default=Enable), 必須改為 Disable, 才能使 Debian or other Linux 正常 reboot/shutdown.
安裝作業系統碰到的問題 :
Windows 7 :
- 需要自行安裝 Ricoh SD/MMC Host Controller 驅動程式 (Google : sp36516.exe); 由 Windows 7 自動搜尋也行.
- Read first : Inspiron 1501 – Windows 7 and 8.1 64 Bit – The Unofficial Windows 10 Reinstallation Guide
- Install AMD graphic card driver. Make the following selection:

Debian :
- download stable amd64 netinst.iso
- don't select desktop manager software
- modify /etc/apt/sources.list : (change stable to testing ???), add contrib and non-free
- apt-get update/upgrade/dist-upgrade/reboot
- apt-get install sudo
- solve " xxx..x not in the sudoers file" : $ sudo adduser cliff sudo
- apt-get install net-tools
- apt-get install synaptic gksu
- apt-get install policykit-1-gnome (D-BUS related) : solve -- "Can't launch Synaptic from drop-down menu"
- apt-get install firmware-b43-installer (僅在 stable version, 才存在???): Broadcom 4311 wireless driver
- apt-get install firmware-linux-nonfree : ATI Radeon driver
- apt-get install xfce4/xfce4-goodies/task-xfce-desktop/wireless-tools/
Debian 9.4 booting ERROR: (畢竟是不再提供BIOS更新的老機器 , 搭配一直在進化的 Linux kernel, 出現一些 warnings 在所難免, 尤其是 ACPI - Advanced Configuration and Power Interface功能; 能用就好, 不必強求; )
--- Spectre V2 mitigation: LFENCE not serializing. Switching to generic retpoline
--- ..MP-BIOS bug: 8254 timer not connecter to IO-APIC
------ That laptop has an early (AMD) ATI Xpress Radeon 1150 256MB HyperMemory (Integrated graphics) GPU... The default video on the install and first boot does not always do well recognizing Radeon or Nvideo without helping it/pointing it in the right direction. Before you can install the OS and intall / configure a graphics driver.
On the boot, add Code:
radeon.modeset=0 noapic
to the end of the Linux boot line as a boot option.
Side effects: The radeon.modeset=0 diables Kernel Mode Setting (KMS) for the hardware. In other words, this option tells linux not to try activating and using the incompatible hardware, which is likely the source of your problems.
When it is used, your computer wikk still be functional, but without the benifits of hardware accelecration provided by the graphics card.
--- ACPI Exception: Could not find/resolve named package element: Z00C (20170728/dspkginit-381)
--- ACPI Error: Needed type [Reference], found [Device] ffff8d894c53abe0 (2017/0728/exresop-103)
--- ACPI Exception: AE_AML_OPERAND_TYPE, While resolving operands for [OpcodeName unavailable] (20170728/dswexec-461)
--- ACPI Error: Method parse/execution failed \_SB.PCI0._OSC, AE_AML_OPERAND_TYPE (20170728/psparse-550)
--- ata1: softreset failed (device not ready)
------ possible solution :
------ 1. CONFIG_SATA_PMP=n
------ 2. 不理, Kernel 已自行有 work around solution
------ 3. grub.cfg add all_generic_ide option
--- dell_smm_hwmon: unable to get SMM DELL signature
2016-04-15
使用 NetworkManager 設定網路
Reference 1. Ubuntu NetworkManager 使用要項
從 RHEL7/CentOS7 開始, NetworkManager 已經過更好的改良, 使用 NetworkManager 服務可以一次設定好網路組態與DNS, 而不用再一個一個檔案修改.
nmcli 為 NetworkManager 主要的設定指令, 包含豐富的參數選項, 更容易調整網路位置, 以往在同一張網卡綁定多個 IP 時需要設定多個網路卡網態, 現在也需要使用一行指令即可隨意增加或修改.
開始設定
IP 與閘道
NIC Name: eno16780032
Tag Name: eth0
Type: ethernet
1st IPv4 IP: 192.168.1.192/24
2nd IPv4 IP: 192.168.1.25/24
IPv4 Default Getway: 192.168.1.1
root # nmcli connection add ifname eno16780032 con-name eth0 type ethernet ip4 192.168.1.192/24 gw4 192.168.1.1
root # nmcli connection modify eth0 +ipv4.addresses 192.168.1.25/24
ifname:網路卡名稱(Deivce 編號)
con-name:網路卡別名
type:網路型態
ip4:IPv4 位置,需加上網路區段
gw4:IPv4 閘道位置
設定 DNS
DNS1: 192.168.1.191
DNS1: 8.8.8.8
root # nmcli connection modify eth0 ipv4.dns 192.168.1.191
root # nmcli connection modify eth0 +ipv4.dns 8.8.8.8
ipv4.dns:設定第 1 組 DNS 位置
+ipv4.dns:設定第 2 組 DNS 位置(若有多個會累加)
Start eth0
root # nmcli connection up eth0
檢查設定
查看 IP
root # ip addr
1: lo:
link/loopback 00:00:00:00:00:00 brd 00:00:00:00:00:00
inet 127.0.0.1/8 scope host lo
valid_lft forever preferred_lft forever
inet6 ::1/128 scope host
valid_lft forever preferred_lft forever
2: eno16780032:
link/ether 00:50:56:bc:5f:90 brd ff:ff:ff:ff:ff:ff
inet 192.168.1.192/24 brd 192.168.1.255 scope global eno16780032
valid_lft forever preferred_lft forever
inet 192.168.1.25/24 brd 192.168.1.255 scope global secondary eno16780032
valid_lft forever preferred_lft forever
inet6 fe80::250:56ff:febc:5f90/64 scope link
valid_lft forever preferred_lft forever
查看 Routing table
root # route -n
Kernel IP routing table
Destination Gateway Genmask Flags Metric Ref Use Iface
0.0.0.0 192.168.1.1 0.0.0.0 UG 1024 0 0 eno16780032
192.168.1.0 0.0.0.0 255.255.255.0 U 0 0 0 eno16780032
查看 DNS
root # cat /etc/resolv.conf
# Generated by NetworkManager
search intra.twlab.net
nameserver 192.168.1.191
nameserver 8.8.8.8
2016-04-14
What does backport mean in Debian?
<用例子(1)來說明>
起因是安裝了 mepis ( based on Debian ) 之後, inkscape 無法輸入文字; 用 debian 的 backport 保守追新
以小心嚴謹出名的 debian, 它的穩定版 (stable) 所收錄的某些套件有時候太舊。 若非得用到某些套件的新版不可, 又不想整個系統更新至測試版 (testing), 或許可以到 backport 碰碰運氣。
在命令列下啟動 inkscape, 用錯誤訊息搜尋到 解決方案: 把 libgtk2.0-0 升級到 2.18.6-1。 一開始我也沒想到 debian 有 backport 這個東東, 就只是習慣性地隨意亂找 rpm 檔, 想用 alien 把 fedora 或其他版本較新的 libgtk2 的 rpm 轉成 deb 隨便應急一下。 不過連 alien 的版本也太舊, 無法轉較新的 rpm 冏rz。
後來回到 debian 官方的套件庫網站, 把 「發行版」 和 「section」 都設成 "any", 搜尋 libgtk2.0-0, 終於在 lenny-backports 底下看見 2.18.6-1~bpo50+1。 我還真的給他手工下載, 安裝, 發現相依問題, 再搜尋下一個套件, ... 然後系統就變得怪怪的, 冏rz。 (我對 debian 真的不熟)
以上是錯誤示範, 可略過。 其實根本不需要手工下載。 點進搜尋結果頁面上的 [backports] 連結, 終於學會如何使用 backports:
在 /etc/apt/sources.list 裡面加一句:deb http://backports.debian.org/debian-backports lenny-backports main
更新套件庫摘要索引資料: apt-get update
現在可以安裝新版函式庫了: apt-get -t lenny-backports install libgtk2.0-0
為了安全起見, 還要在 /etc/apt/preferences 最後面加上:
Package: *
Pin: release a=lenny-backports
Pin-Priority: 200
然後 inkscape 就又可以輸入中英文了!
<用例子(2)來說明>
LibreOffice Included In The Debian Squeeze Backports
Almost all the major Linux distributions are using LibreOffice instead of OpenOffice. Today, it has been announced that Debian Squeeze too will get LibreOffice in the backports.
LibreOffice has been available in Debian Wheezy and Debian Sid for a while now. But in the stable release, Debian Squeeze, it is not available. As a Debian policy, new packages are never introduced in the core repository of a stable release. So, it is very unlikely that Debian Squeeze will ever get LibreOffice in its main repository.
So, users of Debian Squeeze who wanted LibreOffice will have to install it from either the unstable or testing archive. However, Debian Squeeze users will no longer have to do that as LibreOffice has been made available in the Squeeze Backports.
How to install LibreOffice in Debian Squeeze from backports
Note: Installing LibreOffice will remove OpenOffice.
To install LibreOffice from the Squeeze backports, you need to add the backports first. To do that open the Terminal and execute:
$ sudo vi /etc/apt/sources.list
Now add the line given below and save the file.
# deb http://backports.debian.org/debian-backports squeeze-backports main
Now update the software list.
$ sudo apt-get update
Finally install LibreOffice with the command
$ apt-get -t squeeze-backports install libreoffice
2016-04-12
NetworkManager conflict with rdnssd and resolvconf
There are a few daemons all wanting to control your DNS in Debian and Ubuntu. However, it’s better to resolve the conflict and leave one daemon in charge instead of having them battle it out on their own.
The Debian 8.0 “Jessie” network installer installs some packages that leaves you with broken domain name resolution in some situations. Ubuntu 15.04 “Vivid Vervet” also does some strange things out of the box. Both leaving Network Manager with a hard time controlling the systems’ DNS settings. Let us correct this by putting Network Manager back in control.
Assumption for leaving all of networking in Network Manager’s capable hands: You want your network to always configure itself automatically with minimal hassle at any location/Wi‐Fi network. Read on if this sounds like your use case.
Some symptoms indicating that you may have DNS resolution problems:
- Frequent unreliable and slow domain name resolution in browsers and other programs that seemingly correct themselves after some seconds
- It takes a long time for DNS to start working after connecting to a new network
- Only IPv6 resolution working when IPv4 resolution is not working, and visa‐versa
- /etc/resolv.conf is rewritten every few seconds
- /etc/resolv.conf is missing the “# Generated by NetworkManager” header at the top
Check that you’re actually using Network Manager. In most situations on most distributions this will be the case:
- Run service NetworkManager status to confirm that Network Manager is running
- Run head /etc/resolv.conf and look for:
# Generated by NetworkManager
If the header is missing, continue with the below instructions. If it’s there then this post does not hold a solution to your network problem answer. Sorry, but you need to do more research elsewhere to identify your problem.
- Run service rdnssd status to see if rdnssd is also running
- Run service resolvconf status to see if resolvconf is also running
If two or more services are running we may have successfully identified the problem. Network Manager already covers the functionality provided by rdnssd and resolvconf, so you can go ahead and remove rdnssd and resolvconf.
- Run apt-get purge rdnssd to remove it from your system
- Run apt-get purge resolvconf to remove it from your system
- Run service NetworkManager restart to stop and start the Network Manager daemon so it can find the changes
Wait a minute – or disconnect and reconnect your network – and then repeat step 2 to verify that that Network Manager is back in control over your name resolution.
How did this this problem arise in the first place? According to Debian bug #740998, the Debian network installer (for Debian 8.0 “Jessie”) will install the troublesome rdnssd program if the network installer sees an IPv6 environment. The package is not required on systems managed by Network Manager. Debian 9.0 “Sketch” – currently in the testing release channel – have resolved the problem by making the two packages conflict with each other, preventing them from being installed at the same time.
As for resolvconf, it’s a bit harder to track down how that gets installed. I suspect it’s the network installer again but haven’t confirmed it. Although resolvconf alone can almost manage your /etc/resolv.conf file, it will interfere with Network Manager. resolvconf will not setup IPv6 name servers in all situations
Ubuntu extra
Ubuntu always installs resolvconf. If you’re running Network Manager (see step 2), you can remove it. In addition to resolvconf, you also have to deal with dnsmasq in the mix on Ubuntu. dnsmasq is a caching system meant for situations when DNS is broken. As a side effect, it interferes with DNS and gets in the way of IPv6 DNS servers. Assuming you are not on the Moon or the International Space Station, you do not need a separate system‐level DNS caching daemon and can remove it:- Remove (or comment out) the below line from /etc/NetworkManager/NetworkManager.conf:
dns=dnsmasq - Run service NetworkManager restart
If your DNS still is broken, you can start blaming your router or internet service provider at this point. Check to see if you also have issues on other machines on the same network. Debian and Ubuntu’s conflicting oddities should have been neutralized, at least.
2016-04-09
Debian 重新編譯套件 (Rebuilding Debian packages)
雖然 Debian 有很方便的 APT 套件管理工具,讓我們省去了許多自行下載、編譯(compile)、安裝程式碼的過程,但總難免會遇到需要修改程式碼的問題,這時就得下載套件原始碼(source code),接著再根據套件相依性安裝其他套件,最後修改程式碼後進行編譯、安裝,但是問題往往不會如此順利與單純......。
一般透過 APT 所安裝的套件,大多都有經過 Debian 開發者的維護與修補(patch),多多少少會與原本套件的原始碼不同,所以下載其他來源(如官方網站)的套件原始碼進行編譯時,有可能會遇到一些光怪陸離、不知如何解決的問題,例如你可能會遇到你所下載的套件原始碼並沒有針對 Debian 環境的修補,而導致無法順利安裝。
累了嗎?也許你可以有更好的選擇!
如果你所需要的套件是能夠透過 apt-get 就能夠安裝的話,同樣地,你也能夠透過 apt-get source 取得這些已經經過 Debian 維護與修補的套件原始碼!這樣有甚麽好處呢?
重新編譯套件之前,需要三個基本的套件 build-essential, devscripts, fakeroot ,可使用以下指令進行安裝:
接著使用 apt-get source (套件名稱) 指令下載 vim 的套件原始碼(建議使用一個新的資料夾存放原始碼):
下載完之後,一般會有三個檔案(*.debian.tar.gz, *.dsc, *.orig.tar.gz)及一個資料夾出現,以 .orig.tar.gz 結尾的壓縮檔案是未經任何更動的套件原始碼,以 .debian.tar.gz 結尾的壓縮檔案則內含 Debian 的修補檔、編譯指令等等, .dsc 結尾的檔案則是記載要編譯此套件需滿足的相依性,而最後的資料夾則是含有 Debian 修補檔的套件原始碼。以 vim 為例就是以下三個檔案及一個資料夾:
接著可以進入含有修補檔的資料夾中一探究竟:
cd vim-7.3.547
這個資料夾中經過 Debian 維護的修補檔,會存放在 debian 資料夾下的 patches 資料夾內 (debian/patches),修補檔進行修補的順序則是依照 debian/patches/series 檔案內的順序,編譯的指令則是放在 debian 資料夾下的 rules 檔案裡,而原始程式碼則另外存放在 src 資料夾中,整體資料夾結構會如下所示:
一般透過 APT 所安裝的套件,大多都有經過 Debian 開發者的維護與修補(patch),多多少少會與原本套件的原始碼不同,所以下載其他來源(如官方網站)的套件原始碼進行編譯時,有可能會遇到一些光怪陸離、不知如何解決的問題,例如你可能會遇到你所下載的套件原始碼並沒有針對 Debian 環境的修補,而導致無法順利安裝。
累了嗎?也許你可以有更好的選擇!
如果你所需要的套件是能夠透過 apt-get 就能夠安裝的話,同樣地,你也能夠透過 apt-get source 取得這些已經經過 Debian 維護與修補的套件原始碼!這樣有甚麽好處呢?
- 不用再辛苦的除錯、修補 (可減少重複前人作過的事)
- 確保一定能夠在 Debian 上運作
- 節省時間、保留精力
重新編譯套件之前,需要三個基本的套件 build-essential, devscripts, fakeroot ,可使用以下指令進行安裝:
apt-get install build-essential devscripts fakeroot
接著使用 apt-get source (套件名稱) 指令下載 vim 的套件原始碼(建議使用一個新的資料夾存放原始碼):
mkdir myvim
cd myvim
apt-get source vim
下載完之後,一般會有三個檔案(*.debian.tar.gz, *.dsc, *.orig.tar.gz)及一個資料夾出現,以 .orig.tar.gz 結尾的壓縮檔案是未經任何更動的套件原始碼,以 .debian.tar.gz 結尾的壓縮檔案則內含 Debian 的修補檔、編譯指令等等, .dsc 結尾的檔案則是記載要編譯此套件需滿足的相依性,而最後的資料夾則是含有 Debian 修補檔的套件原始碼。以 vim 為例就是以下三個檔案及一個資料夾:
vim-7.3.547
vim_7.3.547-7.debian.tar.gz
vim_7.3.547-7.dsc
vim_7.3.547.orig.tar.gz
接著可以進入含有修補檔的資料夾中一探究竟:
cd vim-7.3.547
這個資料夾中經過 Debian 維護的修補檔,會存放在 debian 資料夾下的 patches 資料夾內 (debian/patches),修補檔進行修補的順序則是依照 debian/patches/series 檔案內的順序,編譯的指令則是放在 debian 資料夾下的 rules 檔案裡,而原始程式碼則另外存放在 src 資料夾中,整體資料夾結構會如下所示:
vim-7.3.547/
             debian/
                   patches/
                   series
                   rules
             src/
如果只是想修改編譯時的參數,只要依照需求修改 debian/rules 即可。
若有更動到 src 資料夾下的檔案就還需使用以下指令提交修補檔(因為這些程式碼都有經過版本控制)!
提交時,會詢問修補檔要用甚麽檔名,此處可依需求輸入,例如 hellomyvim.patch 。
Enter the desired patch name: hellomyvim.patch
提交成功後會出現如下的訊息:
dpkg-source: info: local changes have been recorded in a new patch: ...(略)
編譯之前,需先滿足編譯套件時的相依性,可使用 apt-get build-dep (套件名稱),將需要的套件一併安裝起來。
再來使用執行以下指令進行編譯即可:
若無任何錯誤訊息,編譯之後,在上一層的資料夾中會出現一個 .deb 檔,使用 dpkg -i 進行安裝即可!
參考資料
http://wiki.debian.org/BuildingTutorial
若有更動到 src 資料夾下的檔案就還需使用以下指令提交修補檔(因為這些程式碼都有經過版本控制)!
dpkg-source --commit
提交時,會詢問修補檔要用甚麽檔名,此處可依需求輸入,例如 hellomyvim.patch 。
Enter the desired patch name: hellomyvim.patch
提交成功後會出現如下的訊息:
dpkg-source: info: local changes have been recorded in a new patch: ...(略)
編譯之前,需先滿足編譯套件時的相依性,可使用 apt-get build-dep (套件名稱),將需要的套件一併安裝起來。
apt-get build-dep vim
再來使用執行以下指令進行編譯即可:
fakeroot debian/rules clean
fakeroot debian/rules binary
若無任何錯誤訊息,編譯之後,在上一層的資料夾中會出現一個 .deb 檔,使用 dpkg -i 進行安裝即可!
cd ..
dpkg -i vim-7.3.547_.deb
參考資料
http://wiki.debian.org/BuildingTutorial
Install Full Kernel Source on Debian
Question: I need to download and install a full kernel source tree to compile a custom kernel for my Debian or Ubuntu system. What is a proper way to download full kernel source on Debian or Ubuntu?
Before installing full kernel source on your Linux system, ask yourself whether you really need the full kernel source. If you are trying to compile a kernel module or a custom driver for your kernel, you do not need the full kernel source. You only need to install matching kernel header files, and that's it.
You need the full kernel source tree only if you want to build a custom kernel after modifying the kernel code in any way and/or tweaking default kernel options.
Here is how to download and install full kernel source tree from Debian or Ubuntu repositories. While you can download the official kernel source code from https://www.kernel.org/pub/linux/kernel/, using distro's repositories allows you to download a kernel source with the maintainer's patches applied to it.
Install Full Kernel Source on Debian
Before downloading kernel source, install dpkg-dev, which contains a suite of development tools needed to build Debian source packages. Among other things, dpkg-dev contains dpgk-source tool which can extract a Debian source package and automatically apply patches.
$ sudo apt-get install dpkg-dev
Next, run the following command to download full kernel source.
$ apt-get source linux-image-$(uname -r)
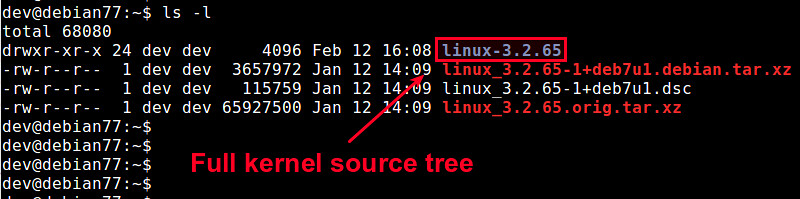
Along with the full kernel source (linux_X.X.XX.orig.tar.xz), any available kernel patches (linux_X.X.X+XXX.debian.tar.xz) and source control file (linux_XXXX.dsc) will also be downloaded and stored in the current directory. The .dsc file instructs how the patches are applied to the kernel sources.
Upon the completion of download, the above command will automatically invoke dpkg-source tool, which will unpack the downloaded kernel source in the current directory, and apply downloaded patches according to .dsc file.
The final full kernel source tree will be available in the current directory as "linux-X.X.XX".
Subscribe to:
Posts (Atom)