GUI library : tcl/tk, Ttk, Tix, pyGtk, pyQt, wxPython
Install pyQt5 : pip3 install PyQt5, pip install pyqt5-tools
2016-11-18
2016-11-10
Dell Inspiron 1501
2018/03/16 : 將 CPU 由 Sempron 3500+ 更換成 AMD Turion 64 X2 TL60 TMDTL60HAX5CT 90nm, socket S1G1 (638). 安裝 Turion CPU後, BIOS PowerNow (default=Enable), 必須改為 Disable, 才能使 Debian or other Linux 正常 reboot/shutdown.
安裝作業系統碰到的問題 :
Windows 7 :
- 需要自行安裝 Ricoh SD/MMC Host Controller 驅動程式 (Google : sp36516.exe); 由 Windows 7 自動搜尋也行.
- Read first : Inspiron 1501 – Windows 7 and 8.1 64 Bit – The Unofficial Windows 10 Reinstallation Guide
- Install AMD graphic card driver. Make the following selection:

Debian :
- download stable amd64 netinst.iso
- don't select desktop manager software
- modify /etc/apt/sources.list : (change stable to testing ???), add contrib and non-free
- apt-get update/upgrade/dist-upgrade/reboot
- apt-get install sudo
- solve " xxx..x not in the sudoers file" : $ sudo adduser cliff sudo
- apt-get install net-tools
- apt-get install synaptic gksu
- apt-get install policykit-1-gnome (D-BUS related) : solve -- "Can't launch Synaptic from drop-down menu"
- apt-get install firmware-b43-installer (僅在 stable version, 才存在???): Broadcom 4311 wireless driver
- apt-get install firmware-linux-nonfree : ATI Radeon driver
- apt-get install xfce4/xfce4-goodies/task-xfce-desktop/wireless-tools/
Debian 9.4 booting ERROR: (畢竟是不再提供BIOS更新的老機器 , 搭配一直在進化的 Linux kernel, 出現一些 warnings 在所難免, 尤其是 ACPI - Advanced Configuration and Power Interface功能; 能用就好, 不必強求; )
--- Spectre V2 mitigation: LFENCE not serializing. Switching to generic retpoline
--- ..MP-BIOS bug: 8254 timer not connecter to IO-APIC
------ That laptop has an early (AMD) ATI Xpress Radeon 1150 256MB HyperMemory (Integrated graphics) GPU... The default video on the install and first boot does not always do well recognizing Radeon or Nvideo without helping it/pointing it in the right direction. Before you can install the OS and intall / configure a graphics driver.
On the boot, add Code:
radeon.modeset=0 noapic
to the end of the Linux boot line as a boot option.
Side effects: The radeon.modeset=0 diables Kernel Mode Setting (KMS) for the hardware. In other words, this option tells linux not to try activating and using the incompatible hardware, which is likely the source of your problems.
When it is used, your computer wikk still be functional, but without the benifits of hardware accelecration provided by the graphics card.
--- ACPI Exception: Could not find/resolve named package element: Z00C (20170728/dspkginit-381)
--- ACPI Error: Needed type [Reference], found [Device] ffff8d894c53abe0 (2017/0728/exresop-103)
--- ACPI Exception: AE_AML_OPERAND_TYPE, While resolving operands for [OpcodeName unavailable] (20170728/dswexec-461)
--- ACPI Error: Method parse/execution failed \_SB.PCI0._OSC, AE_AML_OPERAND_TYPE (20170728/psparse-550)
--- ata1: softreset failed (device not ready)
------ possible solution :
------ 1. CONFIG_SATA_PMP=n
------ 2. 不理, Kernel 已自行有 work around solution
------ 3. grub.cfg add all_generic_ide option
--- dell_smm_hwmon: unable to get SMM DELL signature
2016-11-02
Windows 10 wont sleep automatically

Again at the elevated Command Prompt enter:
powercfg -requestsoverride DRIVER "srvnet" SYSTEM (make sure to use the quotes around srvnet)
To be double sure you could also enter:
powercfg -requestsoverride DRIVER "\FileSystem\srvnet" SYSTEM (again make sure to use the quotes) but I think the first command is really all you need.
2016-10-17
Windows 10 為什麼無法進入睡眠?
以 Administrator 權限執行 cmd.exe, 下達 powercfg /requests 命令. 查出阻止電腦休眠的裝置或程式。
===========================================================
Example :(my case)
Microsoft Windows [版本 10.0.14393]
(c) 2016 Microsoft Corporation. 著作權所有,並保留一切權利。
C:\WINDOWS\system32>powercfg /requests
DISPLAY:
無。
SYSTEM:
[PRECESS] \Device\harddisk\Program Files\Windows Media Player\wmpnetwk.exe 已透過 Windows Media Player 啟用媒體共用公。
AWAYMODE:
無。
執行:
無。
PERFBOOST:
無。
ACTIVELOCKSCREEN:
無。
===========================================================
My solution : 重新設定(關閉) HomeGroup 共享項目
===========================================================
Example :(my case)
Microsoft Windows [版本 10.0.14393]
(c) 2016 Microsoft Corporation. 著作權所有,並保留一切權利。
C:\WINDOWS\system32>powercfg /requests
DISPLAY:
無。
SYSTEM:
[PRECESS] \Device\harddisk\Program Files\Windows Media Player\wmpnetwk.exe 已透過 Windows Media Player 啟用媒體共用公。
AWAYMODE:
無。
執行:
無。
PERFBOOST:
無。
ACTIVELOCKSCREEN:
無。
===========================================================
My solution : 重新設定(關閉) HomeGroup 共享項目
2016-09-26
Serial port on Arduino UNO
0(RX) 和 1 (TX) 這兩支腳。用來接收(RX)與傳輸(TX) TTL 訊號的序列資料。這兩支腳也連接到 USB Converter 晶片中。
不管是 UNO 還是 Nano, 它們都只有一組 UART 串列埠 TX0 與 RX0, 而且與 USB 是共接的, 亦即如果將 Arduino 的 USB 接到電腦用來上傳程式與透過 Serial.print() 來除錯與追蹤執行結果, 那麼串列埠 TX0/RX0 就不能同時接到 ESP8266 來傳送 AT 指令與接收回應.
解決之道是使用 SoftwareSerial 函式庫來將一般 DIO 針腳模擬成軟體串列埠, 參考小狐狸事務所寫的 UART 串列埠測試 :
# Arduino 串列埠測試 (UART)
但必須注意, SoftSerial not working above 19200 baud.
因此, Arduino UNO+ESP8266+SoftwareSerial 搭配使用時, Baud rate 建議使用 9600 bps.
Serial Port Options
- HardwareSerial - Best performance. Always use this first, if available! Teensy and Teensy++ have one HardwareSerial port which is available (not used for uploading or the Arduino Serial Monitor). Arduino Mega 2560 has 3 extra HardwareSerial ports. Arduino Uno has none.
- AltSoftSerial - Can simultaneously transmit and receive. Minimal interference with simultaneous use of HardwareSerial and other libraries. Consumes a 16 bit timer (and will not work with any libraries which need that timer) and disables some PWM pins. Can be sensitive to interrupt usage by other libraries.
- SoftwareSerial(formerly "NewSoftSerial") - Can have multiple instances on almost any pins, but only 1 can be active at a time. Can not simultaneously transmit and receive. Can interfere with other libraries or HardwareSerial if used at slower baud rates. Can be sensitive to interrupt usage by other libraries.
- Old SoftwareSerial (SoftwareSerial in Arduino 0023 & earlier) - Very poor performance.
- If using multiple software serial ports, only one can receive data at a time.
- Not all pins on the Mega and Mega 2560 support change interrupts, so only the following can be used for RX: 10, 11, 12, 13, 14, 15, 50, 51, 52, 53, A8 (62), A9 (63), A10 (64), A11 (65), A12 (66), A13 (67), A14 (68), A15 (69).
- Not all pins on the Leonardo and Micro support change interrupts, so only the following can be used for RX: 8, 9, 10, 11, 14 (MISO), 15 (SCK), 16 (MOSI).
- On Arduino or Genuino 101 the current maximum RX speed is 57600bps
- On Arduino or Genuino 101 RX doesn't work on Pin 13
The library has the following known limitations:
If your project requires simultaneous data flows, see Paul Stoffregen's AltSoftSerial library. AltSoftSerial overcomes a number of other issues with the core SoftwareSerial, but has it's own limitations. Refer to the AltSoftSerial site for more information.
2016-09-14
ESP8266 hardware, firmware, Tools and SDK
Q: maker
A: espressif (樂鑫): find anything you want in the website
Q: firmware upgrade procedure
A:
method 1 : follow this youtube link by maker corner
method 2 : 小狐狸事務所之 ESP8266 韌體更新
Q: boot mode and non boot mode
A:
boot mode : After connected to AP, ESP8266 can upgrade the AT firmware through WiFi by command "AT+CIUPDATE". This mode need the flash size to be 1MBytes or larger than that.
non-boot mode : ESP8266 can not upgrade the AT firmware through WiFi. The flash size can be 512KB.
Q: What is the difference between RTOS and the non-OS SDK?
A:
1. Non-OS SDK
Non-OS SDK 是不基於OS的 SDK,提供 IOT_Demo 和 AT 的編譯。
Non-OS SDK 主要使用定時器和回調函數的方式實現各個功能事件的嵌套,達到特定條件下觸發特定功能函數的目的。Non-OS SDK 使用 espconn 接口, 實現網路操作,使用者需要按照 espconn 接口的使用規則進行軟件開發。
如果要透過AT Command,請燒錄這個SDK。
2. RTOS SDK
RTOS SDK 基於 FreeRTOS,在 Github 上開源。
* RTOS 版本 SDK 使用 FreeRTOS 系統,引入 OS 多任務處理的機制,用戶可以使用 FreeRTOS 的標准接口實現資源管理、循環操作、任務內延時、任務間信息傳遞和同步等面向任務流程的設計方式。
* RTOS 版本 SDK 的網路操作提供了 BSD Socket API 接口的封裝實現,使用者可以直接按照 Socket API 的使用方式來開發軟件應用,也可以直接編譯運行其他平台的標准 Socket 應用,有效降低平台切換的學習成本。
* RTOS 版本 SDK 引入了 cJSON 庫,可以更加方便的實現對 JSON 數據包的解析。
* RTOS 版本相容 Non-OS SDK 中的 Wi-Fi 接口、Smart Config 接口、
Sniffer 相關接口、系統接口、定時器接口、FOTA 接口和外圍驅動接口,不支持 AT 實現。
2016-09-12
關於 ESP8266
單獨 ESP8266, 能做甚麼? : 請看此篇文章 ESP8266 Web Server with Arduino IDE
與 Arduino 結合 : How To Use the ESP8266 and Arduino as a Webserver . 透過 UART 溝通, 可使 Arduino 具備網路遠端控制功能
可使用 Arduino IDE 直接上傳程式進 ESP8266 : Arduino core for ESP8266 WiFi chip
在其網頁下方的說明, 包含非常詳細的文件. 及 USB to serial + ESP8266 接法
AT command 參考手冊 : 4a-esp8266_at_instruction_set_en from espressif
與 Arduino 結合 : How To Use the ESP8266 and Arduino as a Webserver . 透過 UART 溝通, 可使 Arduino 具備網路遠端控制功能
在其網頁下方的說明, 包含非常詳細的文件. 及 USB to serial + ESP8266 接法
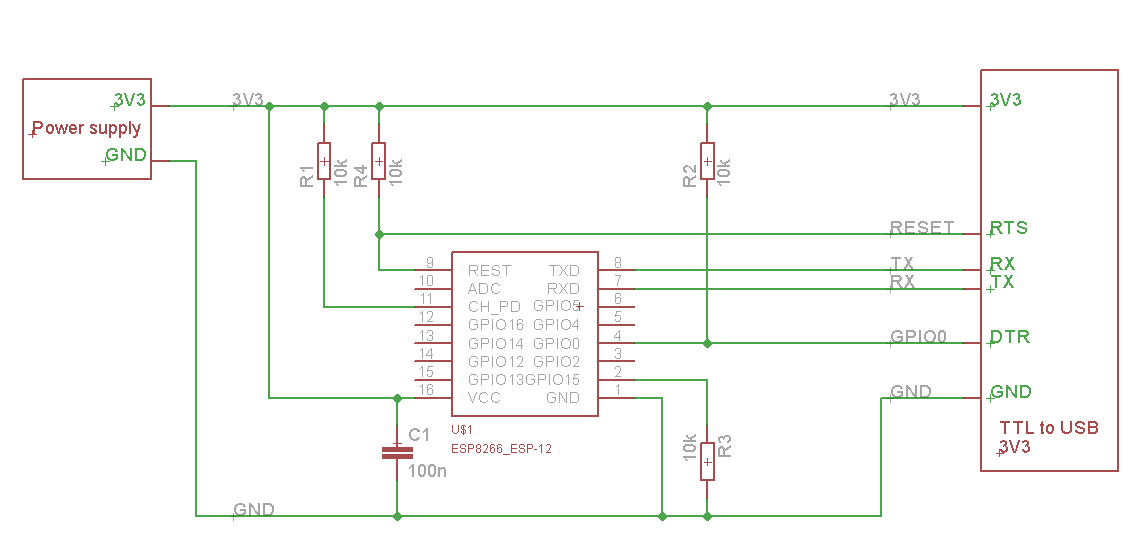
Putting Device Into Flash Mode
To enable ESP8266 firmware flashing GPIO0 pin must be pulled low before the device is reset. Conversely, for a normal boot, GPIO0 must be pulled high or floating.
If you have a NodeMCU dev kit then you don't need to do anything, as the USB connection can pull GPIO0 low by asserting DTR and reset your board by asserting RTS.
If you have an ESP-01 or other device without built-in USB, you will need to enable flashing yourself by pulling GPIO0 low or pressing a "flash" switch, while powering up or resetting the module.
AT command 參考手冊 : 4a-esp8266_at_instruction_set_en from espressif
Subscribe to:
Posts (Atom)